Hints & Tips
Designing An Online Course
Instructional Design...
Any institution that seeks to develop its own content for distance education should invest significant time in researching and understanding the key principles of course design. Why? Because the design of the course content can affect student learning, the primary objective for educational institutions. A large part of the student learning experience is accomplished through interaction with the course content. The academic quality of the distance program relies on the excellence of the institution's online course content. To offer content that will engage and hold students and at the same time achieve the course objectives, institutions must follow strong instructional design principles.
Traditional instructors who have been charged with creating content for online courses require online instructional design support. Faculty cannot be expected to automatically understand how to adapt their existing classroom content to an online format. An institution that seeks to have content developed for its program should assist the faculty content creators by either providing instructional designers or relevant books and other resources regarding online instructional design.
Instructional Design Theories...
Numerous instructional design theories exist. It is important to remember that the course should be designed for the specific type of learners enrolled and the medium in which course content will be presented. Solid course design, based on sound pedagogical principles, brings about successful course management.
Online education has so far been a format used primarily for an alternative delivery mode for distance learning. Distance learning has traditionally served older, adult students rather than traditional students. While the demographics of the online student are rapidly changing, adult learners are typically still the target student. Each institution should evaluate its goals and objectives for the online program and for the course to best understand the audience for the course content.
Pedagogy, by definition, is the art and science of teaching. However, most practitioners in the discipline of instructional design refer to any mode of teacher-led, didactic instruction as following the pedagogical model. Malcolm Knowles introduced in the book, The Modern Practice of Adult Education: Andragogy Versus Pedagogy, the concept of andragogy, which he defined as "the art and science of helping adults learn" (1970,p.35). Today, instructional designers have broadened this definition of andragogy to refer to any instruction that is student-centered, experiential-based education regardless of the age of the student.
Probably the least effective online instructional design method is what we call the "Dump Truck Model" or what Dr. Alistair Fraser, professor at Penn State, termed as "Shovelware." In some of the earliest online education experiences, instructors and course designers simply gathered up all the materials from a traditional lecture course and dumped them into an online format. These materials were not normally student-centered or written to stimulate student interaction. The act of simply putting existing lecture notes and PowerPoint presentations online had poor results.
Courses utilizing this method had high attrition and poor student performance. It was from these early experiences that more successful models were developed. Unfortunately, this method is still used much too often and results in a less than ideal learning environment.
The andragogy model works exceptionally well in online education because of the student-centered and experiential-based education it provides. It follows what many people describe as a true Socratic method of learning. The pedagogy model used in traditional lecture style courses in most institutions today does not. That difference in instructional design models and the way in which they integrate with the technology available to institutions is precisely why course content must be redesigned before being offered over the Web.
Instructional design is important for online delivery because of the non-linear nature of the Internet. In a traditional classroom, the instructor is the gatekeeper of information, choosing how and when the content is delivered. In an online class, students access various points of instruction and related information non-sequentially.
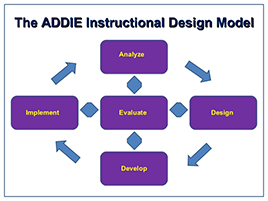
Addie...
ADDIE ModelFollowing a step-by-step model provides a methodical and systematic approach to introducing and improving any process. The ADDIE model of instructional design was one of the first models to propose an organized process for developing and improving instruction. The ADDIE model is a systematic, five-step, cyclical process for developing learning materials and activities. Following these five steps when seeking to create content ensures that important issues are not overlooked or forgotten. |
 |
The Big Picture
If you are considering teaching online or are looking for ideas to freshen-up your current online course, you have come to the right resource. Designing for the online environment presents unique challenges, but it also opens a world of exciting possibilities for engaging students in their learning. Online education is not an "alternative" to traditional classroom learning. According to a 10 year study conducted by the Online Learning Consortium, 6.7 million students have taken at least one online course and roughly thirty-two percent of all higher-education students now take at least one online course during their educational career. And these numbers continue to rise. But despite more interest (from students and academic leaders) and enrollment in the online format, student success rates in online classes lags behind their face-to-face counterparts. So, we cannot afford to ignore the online format, but how do we design effectively for the unique teaching and learning challenges it presents?
Start with the learning; moving from solutions to possibilities!
It is common when transitioning to the online environment to start with the question, "how can I do this online?". If we approach it from this standpoint, we can get stuck looking for ways to mimic or retrofit face-to-face activities. This can be a frustrating and even disappointing solution goose chase. A more productive approach is to start with the question, "what do my students need to learn?". Using the learning as the focal point, you can more easily navigate the amazing possibilities presented by the online environment.
The the most effective teaching principles apply regardless of modality and often stand the test of time. Consider the principles identified by 50 years of research by A. Chickering and Z. Gamson in the "Seven Principles for Good Practice in Undergraduate Education.":
- encourage faculty-to-student interaction
- encourage student-to-student interaction
- promote active learning
- communicate high expectations
- facilitate time on task
- provide rich, rapid feedback
- respect diverse learning
Although the study was conducted in 1987, these principles identified are amongst the most frequently referenced by online course designers as best practices. Keep these strategies in mind as you examine and approach your course design.
Actualizing Best Practice
Before you start! Collect all the materials you use to teach your course.
Organization is key to any project. Gather all the resources from previous courses you have taught, content and instructional materials you have researched or picked-up from colleagues, etc.. Put them in a format/file and store in a way you can easily access (computer, online or USB Drive). This includes your syllabi, notes, textbook, lectures, hand-outs, quizzes, exams, assignments/papers/projects, online resources, journal articles, and any other pertinent resources. Ask your department or colleagues for resources specific to your subject area. Sample syllabi, lessons and even course templates may be available to get you started. Taking the time to organize up front will save you lots of time later, so don't skip this critical part of the process.
Before you start! Establish a timeframe and goals.
Designing a quality course takes time. You need to dedicate constructive and uninterrupted time to plan, design and build. How long it takes is a function of where you are starting (new design or redesign) and your other obligations (work, family, etc.). To ensure your success, establish a realistic timeframe and set goals/benchmarks and deadlines.
1. Map your course by identifying the learning units.
You have probably heard the phrase that a journey of a thousand miles begins with a single step. Whether teaching online, face-to-face or hybrid the first step to any course design is building a map so you know where the course is going. This map should outline the major learning destinations (units/topics) of your course. The unit/topics will become your modules (course building blocks). These blocks may be a concept you wish to examine, a chapter, or some other "chunk". We are chunking the material by unit/topic rather than time (e.g. weeks) or book chapter. Then if we need to adapt the course in the future to a shorter schedule (such as a summer class instead of a semester) or the textbook changes, we can absorb this change without a major revision to the course.
To identify these topics/units, you should look for major learning themes. Other sources of themes can be found by reviewing your textbook or other source material. Indicate which of the course competencies aligns (will be addressed) by that unit/topic. Note that a single unit/topic may address several course competencies and that competencies may also overlap units/topics.
Course Map Sample
Tip: Avoid the temptation to create a unit for each competency, or even worse each chapter in your book! This will overwhelm you and the learner. Typically you should have no more than 5-7 major units. If you have more, they are probably too task oriented…if less, they are too wide in scope.
Resources: A wonderful tool for mapping out your course can be at Popplet or Mindmeister. These brainstorming applications make it easy to quickly map out a course and even share your efforts with colleagues to get feedback and support.
2. Map your modules (learning units).
Now that you have your course map, it is time to dig-in to each module (learning unit). Start with mapping a more typical module for your course. This will serve as a template for your other modules. Each module will have a similar structure, but it is important for you to take your time to map each of your modules. Thoughtful analysis now will pay off as you begin to build your course. These maps can also serve as an excellent visual way to introduce students to each module.
The module map should include the specific unit:
- Materials/Technology (textbook chapters, article readings, lectures, digital tools, videos, podcasts, etc.)
- Activities (formative assessments, practice opportunities, etc.)
- Assignments (worksheets, discussions, papers, etc.)
- Assessments (summative tests, projects, papers, etc.)
Plan for interaction! Make sure your course is rich in opportunities for students to engage with the content, with you and with each other. This means creating diverse activities like discussions, group work, case studies and collaborative problem-solving. Also, be sure to select resources that are relevant and present a variety of viewpoints and meet different learning styles. Consider multimedia, periodicals, web resources, etc.
Module Map Sample
Like the course map, indicate which of thecompetencies aligns (will be addressed) by that unit/topic. Remember that a single module may address several course competencies and that competencies may also overlap units/topics.
Tip: Don't get too caught up in specifics. This map should be an outline of the unit NOT the individual lessons.
Resources: Use a tool like Popplet or Mindmeister to outline each module.
3. Establish your learning unit (module) objectives.
The course and module maps reflect the big picture learning in your course, but what do we want students to learn as a result of completing all the work in each module? We need to create learning objectives. A learning objectives is a measurable outcome statement that captures specifically what skills, knowledge, attitudes learners should be able to exhibit following instruction.
To understand the purpose of learning objectives, let's use the six questions (Who?, What?, Where?, When?, Why? and How?).
Q: What are they?
A: To define what the student should be able to do as an outcome of learning the content concept(s).
Q: Who are they for?
A: For both instructors and students. For instructors they help focus and guide instruction and for students they provide a clear purpose for all the learning activities.
Q: When/Where to use them?
A: To determine if learning was accomplished (outcome).
Q: Why use them?
A: To determine if learning was accomplished (outcome).
Q: How to use them?
A: To design valid assessment tasks and strategies to measure the students' success of content concept(s) learned (alignment).
Now your ready to start building your learning objectives.
a - Creating Learning (Module) Objectives...
It is essential to build measurable and clear objectives that outline what is expected of the learner. These objectives will make it easy to align the rest of your course and will serve to communicate learning expectations to students.
Using Blooms Taxonomy to find Measurable Verbs - Benjamin Bloom and a committee of colleagues identified three domains of learning and objectives can be written for any type of learning (Skills, Knowledge and Attitude). Bloom, and later Anderson & Krathwohl, also outlined categories of thinking. Learning objectives should encourage students to reach higher orders of thinking through careful scaffolding of concepts (structuring learning to build on prior concept knowledge). Using actionable verbs you can create objectives that target learning within these learning types and categories. It is very important that these verbs are measurable so that you can assess whether students understood the concept(s). For example:
Non-measurable verbs: understood, appreciate, learn.
Measurable verbs: explain, discuss, compare, etc.
ABCD Method - An easy framework for creating learning objectives is the A.B.C.D. method. This stands for Audience, Behavior, Condition and Degree. Learning objectives that contain each of these elements will clearly outline the learning that is to be achieved after completing each module.
Watch this brief video to learn more.
Tip: Each module should have approximately 3-5 learning objectives. If you have more, your objectives may be too task oriented or your module theme could be too broad.
Resources:
Use this Blooms Taxonomy Levels Guide to find verbs for your learning objectives. This handy spreadsheet also includes ideas for assignments, activities and assessments that align with these verbs.
Penn State University offers a wonderful interactive tutorial to create objectives according to the ABCD method.
b - Align your module to the objectives...
We all love our course content! As a result, it is tempting to throw everything into your course in an effort to spark that same love in the heart of your students. But how do students know what is important and essential to their learning? How do we help them focus?
Achieving Alignment through a Conceptual Framework
Using the learning objectives you can become more selective in what you include in your course. This selection process is known as alignment. Alignment occurs when the course component (activity, assignment, material, technology and/or assessment) will help the student meet the learning objectives. To get started, build a Conceptual Framework for each module. In this framework outline the learning by identifying the course competencies and learning objectives for the module. Then review the course components (each piece of your module that you identified in the module map process) and see if they fit (align), i.e. contribute to the student achieving the stated learning objective. If a component does not align you need to either change the objective, change the course component or if it is essential to keep this non-aligned component, make sure that it is clearly identified as supplemental.
Tip: Make sure that your framework is as detailed as possible. This framework can be used to provide learners with an overview of each unit that includes what they are to learn (competencies/objectives), with what (activity, assignment, material, technology and/or assessment) and where (in class or online). As an option, you can add a sequence and timeframe to your framework and you have outlined a complete module schedule for your students!
4. Establish clear outcomes to assess learning...
You are almost ready to start putting your course online! But before you do, you need to consider how you will assess student learning. Assessment is more than just tests, quizzes and final projects. Truly "informative" assessment helps students measure their progress and helps to guide your instruction.
Summative and Formative
Assessments come in two varieties, summative and formative. Summative Assessment evaluates student learning, skill and academic achievement at the end of a defined instructional period (i.e. project, unit, course, semester, etc.).Formative Assessments monitor student learning through formal and informal processes to gather evidence to improve learning (i.e. guiding learning from concept to concept, activity to activity and lesson to lesson; identifying clarifications and misconceptions before moving on to the next concept).
C.A.T.s (Classroom Assessment Techniques)
One highly effective type of Formative Assessment is called a C.A.T. (Classroom Assessment Technique). These serve two main purposes, 1) assesses how well your students are learning the content and 2) provides invaluable feedback to guide instruction. C.A.T.s also serve to regularly check that your students are participating and comprehending the content before they get to a Summative Assessment. Regular and purposeful use of C.A.T.s allows the learner to apply and practice what is taught and keeps them engaged in the course more frequently. These opportunities directly contribute to student success and retention.
Tip: Well designed C.A.T.s include a planning, implementing and responding phase.
Resources:
Using C.A.T.s in Online Courses (created by Terry Ann Morris, Ph.D) is a wonderful site that translates traditional face-to-face classroom assessment techniques into online activities.
Rubrics
In order to authentically assess student learning you need to communicate expectations and provide informative and reliable feedback. This can be done by creating a rubric that defines criteria and the quality of the learners work. They measure how well students use knowledge and skills in a real context or for an authentic task (i.e. presentation, problem-solving, experiment, report, participation, etc.).
There are two types of rubrics: holistic and analytical. Holistic Rubrics are broad, make a general judgment to provide summative feedback about overall student performance on a learning task. Analytical Rubrics are more complex and multi-dimensional, providing formative feedback about specific criteria of a learning task.
Tip: Begin by researching previously developed rubrics to get ideas and then make your own. Also consider designing and/or getting feedback from a colleague. This will help you develop stronger rubrics. Don't worry about every detail, rubrics will be fine tuned from use.
Resources:
University of Colorado - Denver: Creating a Rubric, an Online Tutorial for Faculty is a great way to be introduced to the world of rubrics.
RubiStar and rCampus Rubric Gallery are both repositories where educators share rubrics. You can search these resources by grade, subject and project.
5. The Universal Design of Online Courses
Implementing the principles of universal design in online learning means anticipating the diversity of students that may enroll in your course and planning accordingly. These ten key elements will greatly enhance the accessibility and usability of your course for students with and without disabilities.
Consider the capabilities of the platform you will be using, and how you can use these capabilities to promote effective learning. What are your options for communicating course content? What kinds of assessments are possible? Are there good ways to activate the students' prior knowledge? How can the platform help students organize their knowledge? What tools are available to practice and receive feedback?
Consider how students will access the materials. Will students have their own computers? Will they be accessing the course materials on their phones? Will they be completing course assignments from a public library or internet cafe with intermittent web access? Does your course require materials outside of the platform? How will students get these materials?
Consider the diversity of students who will enroll in your course. Consider also the needs of students from different cultures or who who speak different languages.
a - Content first, then design...
Planning online courses with accessibility AND usability in mind can save hours of time down the line. Here is a suggested process for planning your online course.
- Determine what elements and content you will include in your course.
- Use outlines or concept maps to plan flow of content.
- Familiarize yourself and/or seek training to learn what is possible with the course management system you are using.
- Develop a navigation scheme that is based on your outline or concept map.
- Consider the other 9 tips below as you develop your content.
- After you have completed these steps, begin to post content.
b - Provide simple, consistent navigation...
- Be consistent throughout your course.
- Use concise, meaningful text for links.
- To the extent possible, avoid requiring students to drill down multiple times to reach your content.
- Provide a table of contents for easy navigation to all components of your course.
c - Choose CMS tools carefully...
While many of the tools that are a part of most popular course management systems support helpful instructional strategies, they may present barriers for some students. An awareness of the potential barriers may help you determine when to use, when to avoid, and when to provide alternatives to these tools.
d - Model and teach good discussion board etiquette...
- Encourage use of good discussion topics.
- Take advantage of threaded discussion
- Many students are in the habit of creating a new topic heading rather than replying to the previous one. Teach students the advantage of keeping the discussion board organized so that they can scan by topic. Good use of threaded discussions greatly reduces the need for all students, especially those using screen readers, to open messages in order to determine their relevance.
e - Use color with care.
Provide good color contrast.
- Black text on a white or light background is the most readable.
- Patterns and images behind text make it more difficult to read.
- If you are creating an HTML document to post in your course, consider using CSS to assign colors. This allows the user to change the way colors are viewed if desired.
Do not use color alone to convey meaning.
- Students who are color blind - The use of color to convey meaning may result in your images or information not being accessible to students who are color blind.
- Students who prefer to work from printed documents - Some students may choose to print materials using a black and white printer. The images would not be meaningful once printed.
- Another way that color is sometimes used to convey meaning is to differentiate items in a list. For example, a professor may write the following: "All assignments in red must be completed in APA style." This poses a problem for students who are blind and students who are color blind. The use of color is not discouraged altogether. There are definite advantages for other students. It is possible to meet the needs of all of these students.
f - Provide accessible document formats...
HTML
- Pages designed in well-coded HTML offer the ideal format for providing documents over the Internet.
- The use of Cascading Style Sheets (CSS) for formatting and design enhances usability even further.
- If you want to design your own pages, but do not know HTML or CSS, a good Web Page Design application can help.
- Macromedia Dreamweaver™ is recommended as the program that creates the most user-friendly code in terms of accessibility.
MS Word™
- Use formatting tools correctly.
- When you create a word processing document using the formatting tools correctly, you are one step closer to having an accessible web page.
- Another advantage of this feature is that you can immediately create a table of contents for your document.
- Saving as Web Page
- When you use the "Save as Web Page" feature in MS Word™, the application automatically inserts Microsoft™ proprietary code, making the page slower to load and less friendly to screen reader users.
- Another problem with this added code is that it makes it much more difficult for someone who knows HTML to make changes to or maintain your web page.
- Here are some programs that can help you "clean up" the code created by MS Word™:
- Dreamweaver™ - Open your document in Dreamweaver, Select [Commands], then [Clean up Word HTML...]
Adobe Acrobat™ PDF Documents
- PDF files are only as accessible as the document from which they were created.
- PDF files created before Acrobat 4.0 are totally inaccessible as they are simply images of the original document.
- Some PDF files created more recently are also only images because they have been created by scanning the original document as an image.
- Because of the many problems with accessibility of PDF, it is still recommended that an alternate file format be posted along with the PDF-preferably HTML.
g - Choose fonts carefully...
- Choose a sans serif font such as Arial or Helvetica for your text. These fonts are easier to read for most people but especially for those with low vision.
- Make sure font sizes are large enough to read comfortably.
- Limit the amount of text provided in graphics because images may not magnify gracefully enough to be readable by students using magnification software.
- When coding font size in HTML, choose relative sizes (small, medium, large or ems) instead of absolute sizes (pixels).
h - Convert PowerPoint™ to accessible HTML...
Consider This First
Before you begin reading this section, stop and think for a moment about your use of PowerPoint™ as a medium for providing information to students online. We are all guilty sometimes of getting trapped inside the box instead of thinking outside of it. We use PowerPoint™ in class, so we automatically think about how to use it online. The following page may help you determine if you want to use PowerPoint™ in your online course:
Conversion Options
If you determine that you do want to post your PowerPoint™ slides online, your options are as follows:
- Use a conversion tool that creates an accessible HTML version of your slide presentation
- Provide your slides as a PowerPoint™ file with no conversion
- Provide students with a link to the
PowerPoint Reader™ Download - If slides are primarily text, create and provide an outline version of your PowerPoint presentation.
- If slides are primarily images, be prepared to provide a detailed description of them if a student who is blind enrolls in your class.
- Provide students with a link to the
- Provide PowerPoint content in a video format.
- Convert slides and audio to media player format
- Use a multimedia program like Flash
- Provide streaming video of lecturer with slides in background
i - If it's auditory make it visual; if it's visual make it auditory...
Finally, because student learning styles vary, providing opportunities for students to engage with materials in a variety of ways makes the course richer for everyone. Incorporating these diverse strategies may be time-consuming, so this section is divided into two levels.
- Level 1 items are those that should be considered when a course is being developed and implemented before it goes online.
- Level 2 are those items that course designers should work toward as the course is further developed. If you have a student who is deaf, hard of hearing, blind, or who has low vision, enroll in your course these elements will need to be implemented right away.
Level 1
- Use graphs, charts, drawings and photos whenever possible to augment text.
- Add "alt text" for photos, charts and images used in your course. "Alt text" should describe briefly the nature of the visual element.
- Add an empty "alt" tag for any images that are purely aesthetic.
- Prepare typed transcripts of audio and video clips.
Level 2
- Provide captions for video clips.
- Provide audio descriptions for visual elements in video clips.
- Provide detailed descriptions of charts, photos, and images that are vital to your course.
- For example, a graph that is part of the research you are describing in your course content should be described so that someone who cannot see the graph, still has access to the data provided.
- You may need to seek assistance when writing your descriptions so that they will be optimally beneficial to students with vision loss.
6. Start building your course...
Congratulations the hard work is done! No really, it is! You have mapped your course and your modules, created measurable objectives, aligned all your course components (activities, assignment, materials/technology and assessments) and designed meaningful and varied assessments.
The design phase will build a framework and outline for the course. Online education and the computer-based medium from which it is delivered possess unique characteristics. To maximize these characteristics, examinations, assignments, and class interaction should be designed specifically for online education. Each lesson unit and content chunk should be formulated in such a way to provide interaction within the course.
So now what? You are ready to put your course online!
Let's look at strategies to purposefully approach this process.
Strategy 1: Look at Sample Courses...
Examine other online courses to see the features and design elements that you think serve your learning goals. Most faculty like to start by viewing a course in their own discipline, but don't stop there. You'll get a wealth design ideas from courses regardless of the subject area. Good design is not content specific.
Brightspace Courses
Brightspace is our Learning Management System (LMS) for eLearning.
Open Source Courses
Go beyond Brightspace to discover even more amazing course designs.
- Merlot provides peer reviewed online teaching and learning materials.
- edEx Coursesare made available by the Harvard Extension School's Open Learning Initiative. Featuring Harvard faculty, the noncredit courses are open to the public. You do not need to register to view the lecture videos.
- The MIT Open Courseware Initiative makes MIT course materials that are used in the teaching of almost all undergraduate and graduate subjects available on the web, free of charge, to any user anywhere in the world.
Strategy 2: Identify Quality & Aligned Content Materials...
You may want to find additional resources to supplement your own content. The key is make sure that all of your content (regardless of source) aligns with the learning objectives as outlined in Step 3.
Open Educational Resources & the Creative Commons
Open Educational Resources (OER) are freely accessible, open licensed, teaching and learning materials. There are worldwide repositories for the sharing and use of OER. Materials are available in almost any subject area and can include a single image, assignment or activity OR a full textbook and even an entire course.
Community College Consortium for Open Educational Resources
Creative Commons resources are less specific and include a variety of resources (educational in purpose or not) that can be used under specific more open licensing arrangements than traditional copyright process. Items include clip art, images, videos, music and more.
Strategy 3: Going beyond Accessibility; Engage in Universal Design...
Regardless of where you get your content from, it needs to be accessible. But more than that, your content needs to be Universal. Universal Design or UDL is a set of best practices to help instructors meet the needs of all learners. From designing pages that can be read by mobile devices to screen readers, UDL is about considering the wide diversity of learner needs, not just abilities.
University of Northern Colorado, Universal Design for Learning Tutorial
Strategy 4: Using Brightspace...
Brightspace is the SSU adopted Learning Management System (LMS). It is called a learning management system because the focus is on the facilitation of learning, not on the storage of content. You will find that Brightspace provides wonderful opportunities to enrich the online learning environment, including a built-in multimedia tool, the Edu Apps Center, quizzes, discussions, group and peer review, collaborative documents and so much more!
Brightspace is designed to support modules! So, all that hard work you have done mapping out each of your learning units will pay off now. To get started with Brightspace take advantage of one of the many opportunities to learn how the system works.
Strategy 5: Getting Started Module...
SSU has created a course template module "Master Course Template" for instructors to import into their courses. After you login to Brightspace do a serch for Mastwer Course Template. You can view the template contents and then follow the instruction on how to download and add it to your existing course. This module contains valuable resources and activities to get your students started on the right foot including navigating Brightspace, links to key college resources, a best practice syllabus outline and more!
Research shows that students need specific information and activities at the beginning of a class to be successful. Take advantage of this ready made module that includes all of these basics! Once you bring the template in to your Brightspace course, you can modify it to meet your specific needs. Instructions on how to import the template are included within the resource.
Final Thoughts...
Relax! You won't be creating the perfect online course, at least not the first time you teach it. It takes teaching an online course a few semesters to improve and enhance it. Continue to experiment with new approaches, refining your teaching according to your learning objectives and the feedback of your students. We highly recommend including a Course Survey in your final module so that you can collect valuable data and insights from the student perspective on the design, content and delivery of your course. Give yourself permission to be a student too - to learn over time. This guide will help you create a very good online course to start with. You can improve it from there!
Design + Delivery = Learning
Even a well-designed course can fall short without purposeful delivery throughout the course. Delivery includes pacing, feedback, communication, monitoring and adjusting instruction, etc.. that will actively engage and support the diverse learner needs. Continue your professional development by researching and exploring resources on best practices on instructional delivery.
Wearing Four Pairs of Shoes: The Roles of E-Learning Facilitators, by Ed Hootstein discusses the different roles of instruction in the online environment.
Faculty Focus: A Checklist for Facilitating Online Courses, by Mary Bart is useful step-by-step guide to plan for your online course delivery from before the course starts until the final week. It includes an Assessing Online Facilitation worksheet that is very helpful.
RIT Online Course Design, Time on Task discusses how to manage the pacing and work of your course. It includes a calculator that translates time allocation for face-to-face activities to the online environment.